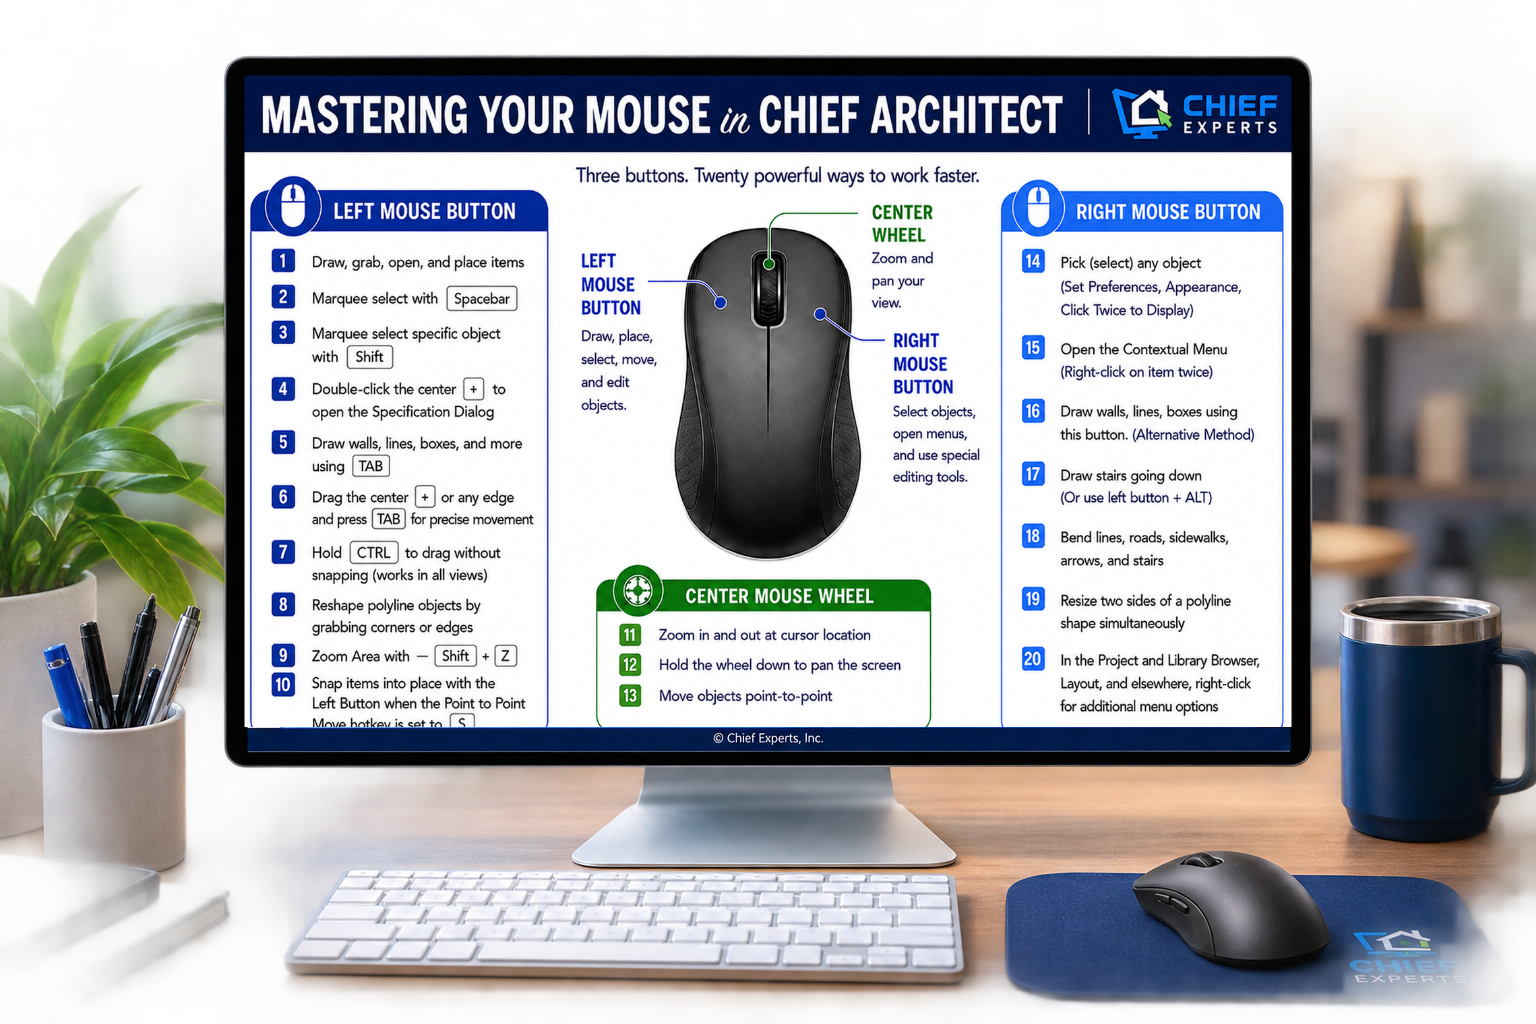
Purpose: Use this guide alongside the video to practice the full range of mouse functions available in Chief Architect. A basic left button, center wheel, and right button are enough to perform every technique covered here.
Left Button: Draw, select, place, open, reshape, and move objects.
Center Wheel: Zoom, pan, and move selected objects point-to-point.
Right Button: Pick, open contextual menus, use alternative drawing methods, bend, and resize.
Left Mouse Button
1. Draw, grab, open, and place items
- Click a drawing tool, then click and drag in the plan to draw the object.
- Click an object or library item to place it in the plan.
- Click an existing object to select it, then drag a handle to move or modify it.
- With the object selected, click the Open Object button to edit its specifications.
2. Marquee-select a group with the Spacebar
- Press the Spacebar to activate the Select Objects tool.
- Hold the left mouse button and drag a marquee around the area you want to select.
- Choose the marquee mode on the toolbar: select objects the marquee touches, only fully enclosed objects, or objects whose center falls inside the marquee.
TIP: The Spacebar is a fast way to return to standard selection mode from almost any tool.
3. Marquee-select one type of object with Shift
- Select the tool for the object type you want—for example, Base Cabinet, Wall Cabinet, Wall, Window, Electrical, or Roof.
- Hold Shift while dragging a marquee over the area.
- Release Shift when the marquee is complete. Chief selects only objects that match the active tool.
- After the group is selected, hold Ctrl and click individual items to add them to or remove them from the selection.
4. Open the Specification dialog from the center handle
- Select one object or marquee-select several objects.
- Locate the center move handle—the plus sign with four directional arrows.
- Double-click the center handle to open the Specification dialog for the selected object or group.
5. Draw an exact size with Tab
- Begin drawing a wall, line, box, or other object with the left mouse button.
- Before releasing the mouse button, press Tab.
- Enter the exact X and Y coordinates or dimensions, then confirm the entry.
- Remember: positive X moves right, negative X moves left, positive Y moves up, and negative Y moves down.
TIP: For example, enter 120 inches for a 10-foot wall, or enter 60 by 60 inches for a square CAD box.
6. Move an object or edge an exact distance
- Select the object and begin dragging its center handle, an edge, or another edit handle.
- While still dragging, press Tab.
- Enter the required distance using the correct positive or negative value, then confirm.
- Use the coordinate display to verify the direction before entering the value.
7. Hold Ctrl to drag without snapping
- Select an object and begin dragging it.
- Hold Ctrl while moving the object to temporarily release snapping and movement restrictions.
- Place the object freely, then release the mouse button and Ctrl.
- Use this in both 2D and 3D views when an object bumps into nearby objects or refuses to move where you want it.
8. Reshape a polyline object
- Select a polyline, image, polyline box, or 3D box.
- Drag a corner handle with the left mouse button to reshape the object.
- Drag a center edge handle to move that edge.
- When needed, use the Break tool to add another edit point, then move the new handle to create the desired shape.
9. Zoom directly to an area with Shift+Z
- Press Shift+Z.
- Drag a box around the part of the plan you want to examine.
- Release the mouse button. Chief immediately fills the screen with that area.
TIP: This is much faster than repeatedly rolling the wheel when you are zoomed far out.
10. Set up and use Point-to-Point Move
- Go to Tools > Toolbars and Hotkeys > Customize Hotkeys.
- Search for Point-to-Point Move.
- In the key-assignment field, type S, click Assign, and accept the assignment if Chief warns that S was previously used.
- To use it, select an object, press S, click the source point, and then click the destination snap point.
TIP: Dan recommends S because it is quick to remember: S for snap.
Center Mouse Wheel
11. Zoom at the cursor location
- Place the cursor over the part of the drawing you want to keep centered.
- Roll the center wheel forward to zoom in and backward to zoom out.
- If desired, adjust pointer and wheel behavior in the mouse settings for Windows or macOS.
TIP: While zooming, Ctrl can also change the zoom speed—faster in plan view and slower for close-up control in a 3D view.
12. Hold the wheel down to pan
- Press and hold the center wheel.
- Drag the mouse to move the plan or camera view across the screen.
- Release the wheel when the view is positioned correctly.
- Use the same method in both 2D and 3D views. Holding the wheel is faster than activating the Pan tool because normal editing resumes as soon as you release it.
13. Move an object point-to-point with the wheel
- Select the object you want to move.
- Press and hold the center wheel on the exact point you want to use as the source.
- Drag that point to the destination snap point, then release the wheel.
TIP: Dan generally prefers the S hotkey for greater precision, but the wheel method is a useful alternative.
Right Mouse Button
14. Pick and select objects quickly
- Open Preferences and enable Click Twice to Display for the contextual menu.
- Right-click an object once to pick or select it without immediately displaying the contextual menu.
- Use the selected object’s edit handles and tools to move, dimension, or modify it.
TIP: In Chief Architect, the right mouse button is often described as the Pick button.
15. Open the contextual menu
- Right-click an object once to select it.
- Right-click the selected object a second time.
- Choose the desired command from the contextual menu. The choices correspond to the edit tools normally shown at the bottom of the screen.
16. Draw continuously with the Alternative Method
- Activate a wall, line, box, or similar drawing tool.
- Use the right mouse button to begin drawing.
- Click each successive point or corner. The drawing tool stays active so you can continue the connected run.
- Close the shape or press Esc to end the operation.
TIP: When Chief Architect labels a command Alternative Method, it generally means to perform it with the right mouse button.
17. Draw stairs going down
- Activate the Stair tool on the level where the top of the stairs will be shown.
- Draw the stair run with the right mouse button. Chief creates the stairs going down rather than up.
- Alternative: hold Alt while drawing with the left mouse button.
18. Bend lines, roads, sidewalks, arrows, and stairs
- Select an object that is created from a line, such as a CAD line, road, sidewalk, arrow, wall, or stair run.
- Grab an end handle with the right mouse button and drag to create the bend.
- Hold Ctrl while dragging if snapping restrictions interfere.
- For a multi-curved arrow or line, insert a break point and bend the new segments in the required directions.
19. Resize two sides of a polyline at once
- Select a polyline, picture, PDF, or similar rectangular object.
- Grab a corner handle with the right mouse button.
- Drag the corner. The two adjoining sides resize simultaneously.
20. Right-click throughout Chief for more options
- Right-click items in the Layer Display Options dialog to reveal layer controls.
- Right-click folders and objects in the Library Browser or Project Browser to see commands appropriate to that item.
- Right-click a library item to copy it to the User Catalog; right-click the User Catalog to create folders, materials, or symbols.
- Right-click in Layout, side panels, dialogs, and other work areas to discover additional display and editing options.
TIP: Make a habit of trying the right mouse button anywhere you are working. The available menu changes with the context.
Bonus: Watch the Cursor
Let the cursor tell you what Chief is ready to do
When placing selected objects such as cabinets, outlets, or stairs, an identifying icon may appear beside the cursor. Other icons can signal that a special editing mode remains active.
Return to Default mode
If a special cursor—such as the Concentric mode icon—will not go away, choose the Default edit behavior on the toolbar. Some tools are persistent until you return to Default; others are one-use tools and turn off automatically.
Watch terrain indicators
A Build Terrain cursor can mean automatic terrain rebuilding is off. Rebuild the terrain manually or turn automatic terrain rebuilding back on.
Essential Hotkeys to Add or Practice
| Key |
Function |
How to use it |
| E |
Open Object |
Assign E to Open Object. Select one or more objects and press E to open the Specification dialog. |
| S |
Point-to-Point Move |
Assign S to Point-to-Point Move. Select an object, press S, then identify the source and destination points. |
| Spacebar |
Select Objects |
Return to standard selection mode and prepare for marquee selection. |
| Shift |
Selective marquee |
Activate an object tool, hold Shift, and marquee-select only that type of object. |
| Tab |
Next object / exact input |
Press Tab after selecting overlapping items to cycle to the next object. While drawing or dragging, press Tab for exact coordinates. |
| Ctrl+Z |
Undo |
Undo the last action. On a Mac, use the corresponding Command+Z shortcut. |
| Esc |
End current function |
Stop a continuous right-button drawing operation or cancel the active command. |
Keep learning: Get ongoing Chief Architect training and support inside the Chief Experts Pro Academy.